Doodle Tips 2

Every experienced artist has some tricks up their sleeve. That’s why we decided to ask some of our favorite artists for their top doodle tips. Here’s our second installment of Doodle Tips.

Doodle Tips

Our first tip is a coloring trick from illustrator/writer Megan J Herbert :

Tip #1 – Megan J Herbert


Don’t color all the way to the edges.


shading tip by Megan J Herbert

I love how Megan shows us this technique – it works really well. I’m going to make sure I try it next time. Megan is an avid cartoonist – don’t forget to check out her doodles on instagram, or more of her work here.

***

Our next tip is from Hanna aka “geeksarecool,” who often draws digitally, using computer software such as Adobe Illustrator and Photoshop. Hanna likes to draw fan art, pets and people.

Tip #2 – geeksarecool


If you are drawing characters, do lots of sketches & play with different shapes. Don’t be afraid to exaggerate & don’t worry if you feel ‘stuck’ or if things look a bit weird. Keep going & have fun!


This is really good advice. To get a good drawing, sometimes you have to do more than one. Draw lots of them! Here’s one of Hanna’s cool characters on instagram:


View this post on Instagram


A post shared by @geeksarecool

***

Our final tip comes courtesy of artist Jason Martian (aka Jason Martin), whose long art career includes graphic design, illustration, photo-retouching, art direction and instruction.

Tip #3 – Jason Martian


Draw with simple shapes such as circles and triangles.


cat doodle

See how many creatures and objects you can doodle using a combination of shapes, such as circles, squares, or triangles.

***

Hope these tips help you with your own drawings. Here’s a bonus doodle tip for you.

Do you have a tip for us? Leave it in the comments below. We’d love to add them to a future installment of our Doodle Tips series. Happy doodling!

Follow my blog with Bloglovin

Awesome Artists : Fred Blunt

awesome artists

In this series, Awesome Artists, we talk to our favorite artists to find out their techniques, learn how they draw, and get their tips for creating. Last time, we spoke to two artists who gave us a peek at their recent book projects: Richard Jones, illustrator of The Snow Lion, and Colleen Kong, illustrator of The Turtle Ship. Today, we’d like to introduce you to author AND Awesome Artist Fred Blunt.

Meet Awesome Artist Fred Blunt

Fred Blunt is an award-winning illustrator of a bunch of picture books — they all have his signature scribbley style, as you shall soon see (SORRY, I’m a fan of alliteration). Fred is kind enough to share some behind-the-scenes sketches from his latest book, Lionel the Lonely Monster

Lionel the Lonely Lion cover


Kidcandoodle: Hi Fred! Can you please tell us about your new book, Lionel the Lonely Monster

Fred Blunt: Lionel the Lonely Lion is a light-hearted story of friendship, kindness and the power of a hug.

KCD: What inspired the character?

FB: I’ve always loved monsters… right back to watching the muppets when I was little. I always loved the big scary-looking one “Sweetums” (from the Muppets, shown below), and I can still remember my mum reading me Where The Wild Things Are by Maurice Sendak when I was very small. 

sweetums


And Not Now, Bernard by David McKee is perhaps my favorite picture books of all time. So perhaps monsters have always been lurking, waiting to get out into a book for me?

Lionel monster inspiration


The story was actually inspired by a comic I wrote around 2012, called Rupert The Frog: A heart-warming tale of a frog who hates his un-froggy name, comforted by a bug cuddly bear who turns out to be called Kermit. I couldn’t work out how to make that into a picture book text, with the pop culture references, so I decided to write a story that had a similar heart, but more accessible.

Rupert the Frog


KCD: Can you show us more sketches from the story? We sometimes like to see what ideas don’t work, as well as ones that make it into the book.

FB: I think perhaps this is the very first drawing of Lionel in my sketchbook. The monster is sitting, looking sad, with a concerned little dog looking on.

first sketch for Lionel


These are my first scene drawings in my sketchbook… I tend to come up with little scenes, sketched very quickly – just trying to get something onto the page, to see if anything is working or worth exploring.

lionel sketch


lionel sketch


Many of these little scenes made it into the book, although the rowing boat didn’t.

lionel scene


lionel scene


Here’s a scene that was in my first draft manuscript, but sadly didn’t make it into the book.

lionel cut scene


It’s always painful to lose a nice visual gag or a nice line, but with only 32 pages, some good things have to go!

KCD: How did you choose the colors for the book? (I don’t think I’ve ever seen a PINK monster before – does that mean he’s girly?)

FB: The color palette came directly from my first color drawing of the cast of characters: Lionel with Lucy on his shoulders, walking Milo.

Lionel and Lucy, walking Milo


I liked the combination of colors and relished the chance to create a world in this limited palette. I tried a few sample illustrations and (the publisher) Oxford University Press was brave enough to let me tackle the whole book like it.

lionel title page


Lionel doesn’t mind if you consider him girly for being pink… he’s very at ease with his monsterhood! To be honest, I’ve never seen colors as either being for girls or boys… perhaps that’s because I grew up in the ’80s and it was the law for boys to wear pink Lacoste polo shirts, coupled with lemon yellow cardigans!

lionel scene


KCD: I love that your first sketch ended up being very close to the final cover art. It shows that sometimes…

“In drawing, nothing is better than the first attempt” – Pablo Picasso

FB: Picasso is my absolute art hero… the confidence of his work is what makes him so mind-blowing for me! It’s lovely when a cover comes so easily from your first thumbnail… it’s happened twice to me now – this and my book Gnome. I think when it comes to covers for picture books, the simpler and bolder the better; I find that my best work is the work that flows easily and naturally. The challenge is retaining the energy of a thumbnail into the final art.

***

Thanks for sharing your process with us, Fred. Please check out Lionel, the Lonely Monster by Fred Blunt, available here.

lionel hug


***

smileEvery professional illustrator sketches ideas before doing a final piece of art. The first sketches are very loose. Fred says, “I never worry about good drawings at this stage, I just want to get ideas onto the page.”

trythis

Next time when you want to create something, try sketching out a few ideas first. See how many ways you can approach the drawing, trying it in different way each time. Good luck!

***

All images copyright© Fred Blunt and used with permission.

Follow my blog with Bloglovin

Doodle Tips 1

Every experienced artist has some tricks up their sleeve. That’s why we decided to ask some of our favorite artists for their top doodle tips. Here’s what we learned.

Doodle Tips

First up is American author and illustrator Matthew Cordell, whose 2019 book, Wolf in the Snow, won the Caldecott Medal. He also made a book called Hello Neighbor! about one of our favorite people, Mr Rogers. Matthew’s latest book is Bear Island.

Tip #1 – Matthew Cordell


Try to doodle everyday, not with a pencil, but with a pen. It’s fun to see what happens, and it sharpens your hand and eye [coordination] when you can’t erase.

pencil and pen
Drawing without erasing might seem like commitment, but we dare you to try it! Follow Matthew Cordell on instagram to see his drawings and stay for his awesome bird-watching adventures in his stories.

***

Our second doodle tip is from lifestyle illustrator Nadine Mnemoi, whose last name sounds like the sound you make when you kiss. Nadine prefers to doodle digitally, and often cheers us on with her colorful art featuring women.

Tip #2 – Nadine Mnemoi


To be productive and fast, choose the color palette before coloring.

Limiting your color palette to a few shades can also make your work look more sophisticated,  and refined. Which colors would you pick, if you could only use three?

***

Our third expert doodler is Neil Emmanuel, whose experience includes animation and teaching. Neil is currently working on a graphic guide about the Middle Ages. Here’s a preview below.

Neil Emmanuel_middle ages

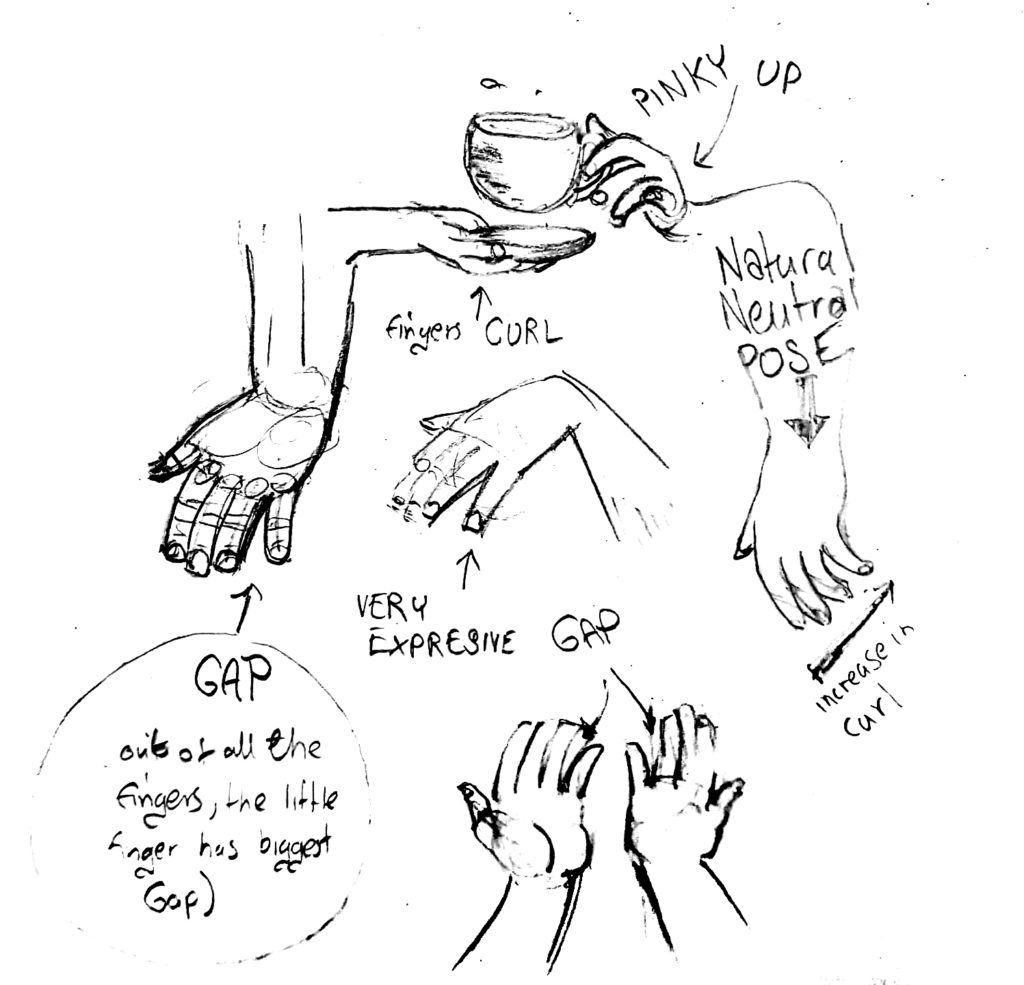
Neil’s advice is technique-oriented, and involves drawing something people often consider tricky : hands.

Tip #3 – Neil Emmanuel


[When drawing hands] you can exaggerate the little finger gap in a pose to add a bit more life… all fingers together, flat, looks like a marching military hand.

See how Neil adds a bit of space between the pinky and ring fingers in his doodle above? You should try it next time you’re drawing hands, and see if it gives your drawings a bit of a lift.

***

Hope these tips help you with your own drawings. Here’s a bonus doodle tip for you.

Do you have a tip for us? Leave it in the comments below. We’d love to add them to a future installment of our Doodle Tips series. Happy doodling!

Follow my blog with Bloglovin

Awesome Artist : Colleen Kong

awesome

In this series, Awesome Artists, we talk to our favorite artists to get insight on how they draw, and get their tips for creating. We spoke to  Allison Langton, who shared her watercolor techniques with painting plants, and Tim Miller, who gave us a peek into his process for creating the picture book, Snappsy the Alligator. Today we welcome back one of our friends, Colleen Kong-Savage, who was our very first guest for 3 & 1/2 Questions.
 

Meet Awesome Artist Colleen Kong
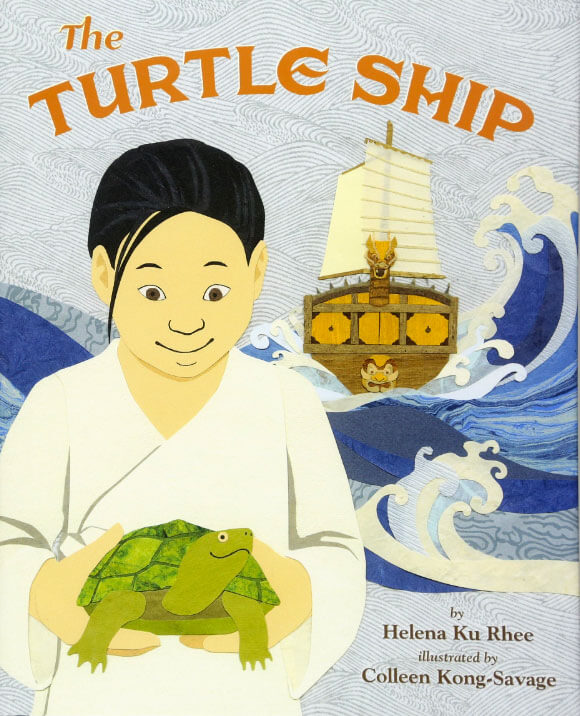
 
TurtleShip_cover

I’m so excited for Colleen as this is her debut as a picture book illustrator. Above is the cover of The Turtle Ship by Helena Ku Rhee, illustrated by Colleen Kong-Savage. Colleen uses a technique called collage – doodling with paper. We’re so excited to share Colleen’s process in drawing with scissors and paper.

The Turtle Ship is a story about a poor boy named Sun-sin who dreams of traveling the world. One day a contest is announced that the winner of best ship design would get to sail with the royal navy. Sun-sin’s idea for a ship is inspired by his best friend, a turtle called Gobugi (which means “turtle” in Korean).

Colleen is going to share with us one of the most difficult scenes she worked on for the book, as seen below.
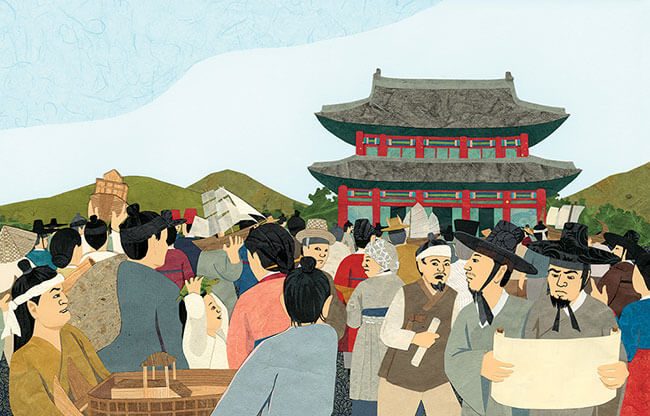
KCD: Hi Colleen. Thanks for stopping by and sharing your work with us! Can you tell us a little bit about this scene from the book?

CKS: For this scene, I wanted show the Gyeongbokgung Palace, which was the grandest of all the palaces built in the Joseon Dynasty, the period in which Sunsin lived. So I did a sketch to show the art director how I planned to illustrate this scene. It was rough, messy, and fast because the purpose of the sketch was to show the Art Director my idea.

The Art Director said, “We like the expressions of people wondering why a kid is there with a turtle. It’s cute the way you have him holding the turtle on his head. We suggest backing out in space so we can see many more of the “hundreds of people.” Right now it looks like there are only six other people.”
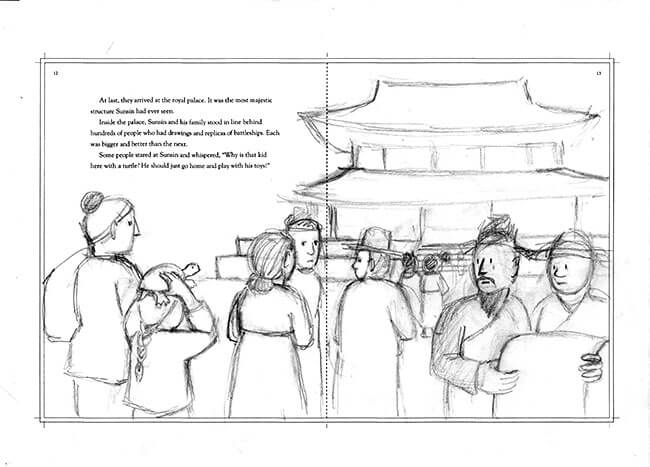
Arrival_sketch 1

smileNote that Colleen shows a sketch before starting a final drawing. The above is the first one she showed, and she does a few more before it gets approved to proceed to final draft.
trythisBefore doing a drawing, see how many ways you can sketch the drawing. Trying different viewpoints or changing something about the subject or try different ideas.

KCD: How did you react to the Art Director’s feedback?

CKS: I don’t know if you ever noticed — drawing people is not easy, not even for a professional artist. But the Art Director was right, I hadn’t drawn very many people, so I sketched some more.

“How’s this?” I asked the Art Director.

She said, “This is a little better with a few more people added, but we still don’t get a sense of hundreds, and nobody has a replica of a battleship.”
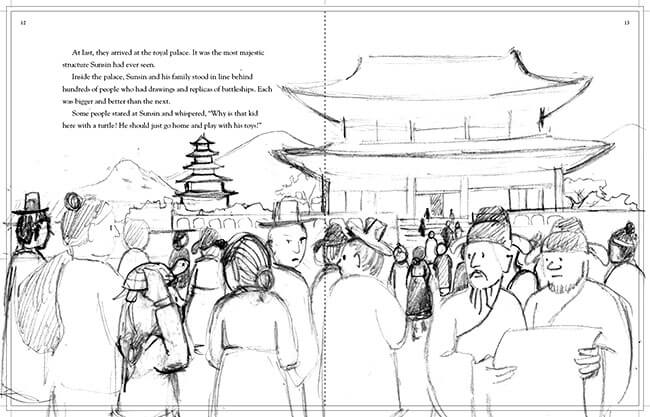
Arrival_2

Argh! Drawing a crowd is a lot of work! You have to make up many different faces, and many different bodies doing different activities, wearing different clothes, in different positions from the viewer’s point of view. Plus as a collage artist I was imagining all the like tiny bits of paper I’d be cutting out in the final illustration. And oh yeah, I had forgotten about the replicas.

“How about this?” I asked the Art Director. “Is this enough people and battleships? And do you like how you can see Sun-sin’s face now? I want people to see that he’s excited to be here.”

Thankfully, the Art Director said, “YES!”
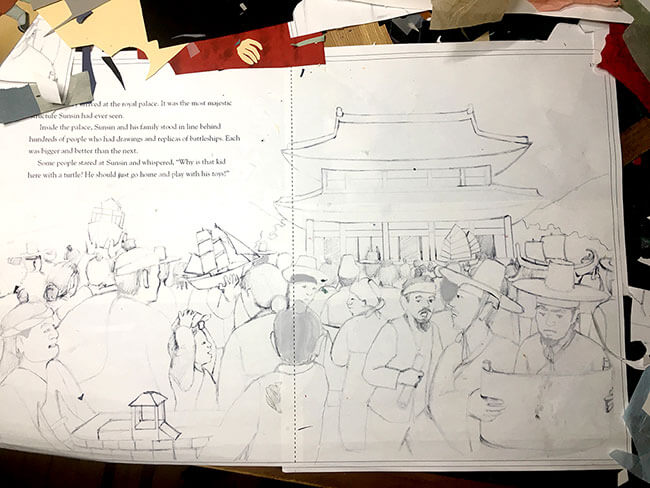
Arrival_3

KCD: How do you start drawing with paper?

CKS: I make many copies of this drawing. I use most of them to help me cut out all the individual shapes from the papers I want to use. With the help of a light table I trace facial expressions. And I always keep one copy of the master drawing whole. 
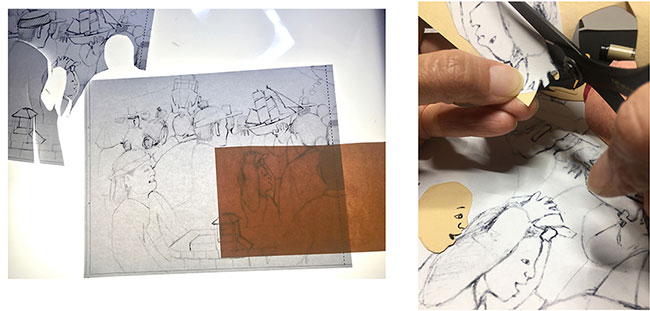
This copy is my template and it helps me figure out where to put the pieces.
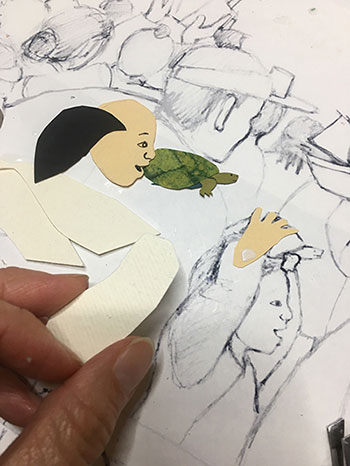
As I put the pieces in place I glue them to each other—not onto the template. I will glue the crowd to another background when it’s complete.
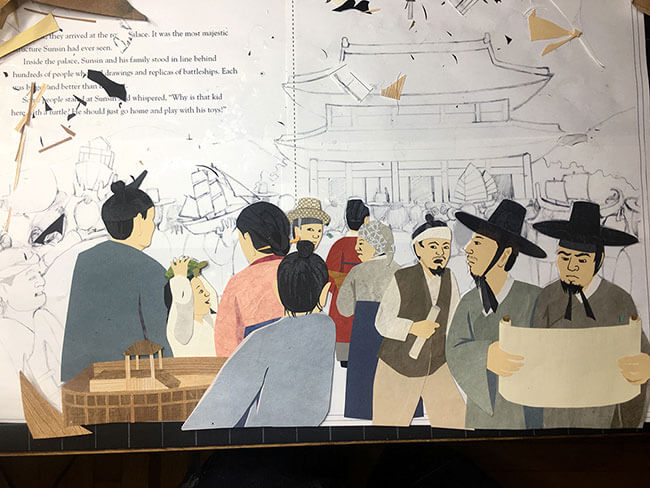
This is what the back of a whole crowd of people look like.
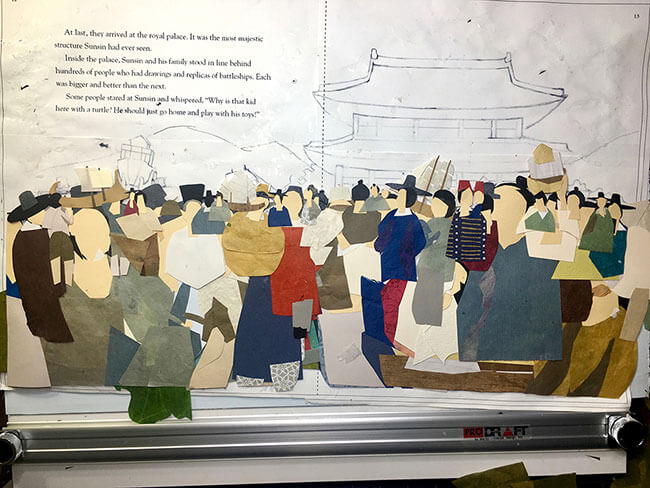
Arrival_8

***

Phew! I bet it took a long time to complete pasting all the people and their details. Here is the completed scene again. Thanks for sharing your process with us, Colleen!


smileEvery professional illustrator sketches ideas first before doing a final piece of art. The final art takes a long time, so it’s important to work out all the details first, and that way, you’ll make all your mistakes in the early draft and not the final art.

trythis

Next time when you want to create something, try sketching out a few ideas first. See how many ways you can approach the drawing, trying it in different way each time. Good luck!

***

Colleen Kong-Savage is an illustrator, artist, and graphic designer. Her picture book debut, The Turtle Ship is published by Shen’s Books, a multicultural children’s book publisher based in California. Shen’s Books aims to emphasize “cultural diversity and tolerance, with a focus on introducing children to the cultures of Asia.”

All images courtesy of Colleen Kong-Savage.
 

Follow my blog with Bloglovin


How to Draw : Start with a scribble

start with a scribble

Start with a scribble.

How do we learn how to draw? We start with a scribble. By doodling lines and squiggles, we begin to transform the blank page into a drawing.

At kid can doodle, we believe EVERYONE can draw. But each person’s confidence with drawing varies, so we’ve been thinking about how to encourage and support those doodlers who desire more guidance. We knew we didn’t want an outcome-oriented “How to Draw ___” with specific steps for copying each subject. Instead, we wanted to create a doodle approach that could be applied to drawing anything, would build confidence and observational skills, and is a bit silly and imaginative at the same time. It’s a tall order — which might be the reason it took four years to put this together — we hope you like it.

Welcome to kid can doodle class. This is your first doodle lesson. Click on this link to download a worksheet for this lesson, or grab a piece of paper and follow along below. Please NOTE: When downloading from our site, you agree to these terms. Happy doodling!

Start with a scribble.


Doodle Warm-up

Always begin drawing with a quick warm-up exercise. This one is super simple. Start scribbling. Try make your squiggles look like . . .

scribble_squiggle
a snake

scribble_hand

hand(s)
scribble_tree
a tree

scribble_hair

hair
scribble_cloud
cloud(s)
a tornado or cyclone
scribble_dogs
dog(s)
scribble_beard
a beard


This is conscious scribbling. Spend only a second or two on each scribble but think about how you can make them resemble some thing and how you can vary each one. Warming up before you draw helps you loosen up.

Doodle Exercise : Blind Contour

Blind contour drawing is a technique in which you draw the outline of a subject without looking at your page or pencil. Focus only on the object that you are drawing.

For this exercise, doodle your non-drawing hand. So if you’re left-handed, draw your right hand, and vice versa. Remember to look at the object you are drawing, and not your actual drawing. This will take practice as you will want to look at your paper. No peeking! Resist the temptation!

Rotate your hand into another position and draw it again. Repeat.

try thisDoodle TIP : Pretend you are tracing your doodle subject with your pencil; follow the outline of your hand model with your eyes while allowing your drawing hand to follow with the pencil on the paper.

Here’s my show of hands. It’s ok if they overlap, too.

scribble_show-of-hands


If you trust in this method, you will improve your observational skills, which will help you become better at drawing. The purpose of this exercise is not to make a life-like drawing, but to teach yourself to see and focus. It will help you improve your hand-and-eye coordination skills.

Share your doodles with us! Don’t forget to tag them with #kidcandoodle or #startwithascribble

If you liked this lesson, please sign up for our new doodle club on ko-fi. Let us know what you think in the comments below. For more doodle fun, download Doodle Bugs.
 

Follow my blog with Bloglovin

Awesome Artists : Richard Jones

awesome

In this series, Awesome Artists, we talk to our favorite artists to find out their techniques, learn how they do things, and get their tips for creating. We spoke to Kirsten Ulve to get pointers on sketching people, and Allison Langton, who shared her process on painting plants in watercolor. Today we get a peek into the mind of Richard Jones, via his sketchbook for The Snow Lion (a collaboration with Jim Helmore for Simon & Schuster Children’s Books). Richard shows us how he created the characters for this special book.

Meet Awesome Artist Richard Jones


Snow Lion cover

I confess — I’ve been admiring Richard Jones’ work for awhile now. What he does with paint and color is pure magic. I’m so jazzed we get to share his work with you! I think you’ll adore it too.

KCD: Hi Richard. Thanks for being one of our Awesome Artists! Can you share with us how the character of Caro came to life? Were there influences in her formation?

RJ: I began sketching ideas out in my sketchbooks first. My first character sketches of Caro were quite different from how she eventually appears. Most of my original character sketches had her being a little older and rendered a bit more realistically. I think it was Jane, my art director at Simon & Schuster who suggested that Caro might loosen up a little and I’m so glad she did!
Richard Jones' Cora

Richard Jones' Cora Richard Jones' Cora

Once I found her character, things fell into place and she was a joy to draw. In terms of her appearance, Caro is a combination of the two girls that help me at the very beginning when I needed someone to pose for me! (I dedicated the book to them!) Richard Jones' Cora

Her clothes did take a little time to get right. I liked the idea that even inside her new home she was often buttoned up in a large and warm, protective coat. When she’s having the most fun with the lion her clothes are a little more colourful and jolly!

smileNote how Richard plays around with the character’s age and hair. The clothes and big hair make her younger.

RJ: Caro’s friend Bobby and his dog evolved from my sketchbooks in a similar way…

Richard Jones Richard Jones

trythisDraw a girl or boy and try different hairstyles and clothes on them. See how you can change their age or personality by changing what they wear.

KCD: What was most challenging about creating the title character The Snow Lion?

RJ: The Snow Lion took many, many pages of sketchbook scribbling before I was satisfied I had found his character. It was clear early on, however, that his and Caro’s relative sizes would be important to how we understood their relationship — too big and he seemed overbearing, while when he was much smaller he seemed to lack the qualities of comfort and support he needed to offer her.
Richard Jones

KCD: The lion is so plush and comforting; I think that adds to the sweetness and feeling of the story. There’s something about how you convey that connection — I can see a child wanting that protection and bond too. Did you have inspiration for that?

RJ: Again, it was Jane that had a big influence here. She kept saying ‘softer, softer, softer!’. Surprisingly that wasn’t as off-putting as it sounds…. As we were beginning work on The Snow Lion I was finishing off another story in which I’d painted a snow shoe hare against a blue background. It’s my favourite page in that book and his white, fluffy fur definitely influenced how I began to create Caro’s lion.

I was conscious that there was a potential for the whiteness of his coat to seem cold and perhaps a little sterile, especially against some of the white walls in the early spreads, so I took my time warming him up a little with lots of water colour washes and gentle textures. Jim [Helmore]’s choice of a lion for her companion is just the perfect. He’s the ideal animal for the role — Caro can hide behind his huge body when she’s feeling unsure, or sink into the comfort of his soft mane when she wants a cuddle!

Although his scale may shift fractionally through the spreads to suit the circumstances, his warm fur and soft mane is always available when she needs him!

Richard Jones

A very early character sample. The painterly quality of his fur made it into the final book though his bushy mane grew in stature!

Richard Jones

It was a real honor to work with such a beautiful and sensitive tale. It’s a story that I hope will resonate with all little ones who are struggling with change of one kind or another. The Snow Lion reassures both Caro and the reader alike that loneliness and sadness are natural but never last forever.

smileSee how Richard makes the character Caro feel safe and secure with The Snow Lion, rather than frightened or scared?

The Snow Lion by Jim Helmore and Richard Jones, published September 2017 by Simon & Schuster Children’s Books.

***

Richard Jones is an illustrator based in Devon, England. He also illustrated Town Mouse, County Mouse and Feelings for Little Tiger Press.

trythisTry sketching a character from one of your favorite stories. Consider how you could change him or her by changing the way they look. For instance, what if Goldilocks didn’t have blonde hair. Or what if Pippi Longstocking was a boy instead? Consider how changing their hair or clothes can really change the story or how we feel about the character.

All images are courtesy of Richard Jones and copyright of the artist.


Follow my blog with Bloglovin


How to Draw Bugs with Yuval Zommer

We’ve been longing for those hot, summer days in Australia lately, now that temperatures are around freezing in London. Let’s pretend it’s warm weather by doodling bugs with Yuval Zommer, author of The Big Book of Bugs, published by Thames & Hudson.

bugs1

How to Draw All Kinds of Bugs (by Superfly Freddie)


Follow Freddie’s step-by-step guide:

You’ll need your favorite pencils, pens, markers, or crayons.

bugs2


First draw and color some shapes on your page. (Some can be oval, or wormy shapes)

bugs3b


Then add the legs. How many do spiders have? Do worms have legs?

bugs4b


Your bug will need eyes and mouth, and maybe antennae.

bugs5


Can your bugs fly? How many wings will they have?

bugs6


Decorate them with dots, stripes, or hair!

bugs7


Give your bugs a habitat, such as a rock or plant to climb.

bugs8


Freddie and his pals love picnics. Feed them your fruit and crumbs.

bugs9


I love how drawing bugs will help you take extra notice of them, the next you see them. The book is chock-full of info about creepy crawlers and flying insects. Learn how bugs show off, where they hide, their life cycles, and why they love our homes. Become an expert bug spotter with Yuval Zommer’s The Big Book of BugsPsst! get it here.


big book of bugs


PS. Big shout out to all our friends down under. We miss you!

All art copyright Yuval Zommer. Via The Guardian


Follow my blog with Bloglovin

How to Draw a Penguin by Oliver Jeffers

How to Draw a Penguin by Oliver Jeffers

Oliver Jeffers_penguin1

Oliver Jeffers, author and illustrator of many picture books including Lost and Found, Here We Are, A Child of Books, and STUCK (my personal favorite), shows us how to draw a penguin.

Oliver Jeffers_penguin2

It might be tricky to borrow a penguin (for drawing reference), but you might find one at a nearby zoo. Or if you’re lucky enough to visit Phillip Island in Australia, you can see small fairy penguins return to their habitats at the end of the day in the “Penguin Parade.”

Oliver Jeffers_penguin3

You could find the penguin documentary, March of the Penguins, and draw the flightless birds while watching, or by pausing the video.

Oliver Jeffers_penguin4

Penguin doodling begins with simple shapes: circles.

Oliver Jeffers_penguin5

Then connect the circles.

Oliver Jeffers_penguin6

Add oval-shaped wings.

Oliver Jeffers_penguin7

Color in your penguin.

Oliver Jeffers_penguin8

Add details.

Oliver Jeffers_penguin9

If you don’t have white paint, make sure you leave white dots for the eyes by NOT coloring them in.

Oliver Jeffers_penguin10

Shading can be tricky, but remember: shadows are cast away from the light, and that side of the object/subject will be slightly darker than the side nearer to the light.

Oliver Jeffers_penguin11

His feet are doodled much like his beak!

Oliver Jeffers_penguin12

Voilà! You’ve doodled a waiter. Happy doodling!

For more doodling feathered friends, check out How to Draw Birds.

All art copyright Oliver Jeffers, via The Guardian.


Follow my blog with Bloglovin

Doodling with Leaves

drawing_with_leaves

Have you been inspired by autumn? I have! It’s hard not to be, when I see all the gorgeous golds, reds, or oranges brightening the trees, and now carpeting the ground. I’ve been thinking of different ways to draw with leaves. Leaves make great subjects for doodle studies, because they are

  • easy-to-find
  • portable
  • come in different colors and shapes
  • simple & complex — good for all ages and abilities
  • they’re a perfect excuse to go on a scavenger hunt

Go for a walk in your backyard or nearby park. Try to find leaves in as many different shapes and sizes as possible. If there aren’t many varieties in your area, look for variations within the same tree. See if you can find at least 10 different kinds.

Doodling with Leaves : 5 Ways to Draw


1. Contour Color Layering

You will need different colored-pencils or pens. Start with the simplest leaf shapes and advance each time to a more complicated one. Look at the edges — are they smooth or jaggedy? Are they curved or pointy? Are they symmetrical?

kcdleaves_outlines

Doodle each leaf shape as an outline in a different color. Layer one shape over another shape like this, until you have a nice composition:

drawleaves1

Alternatively, younger doodlers can trace the leaves to compose your design.


2. Mapping the Leaves

This drawing requires a bit more patience and observation of the lines on the leaf. Lightly sketch the outline of the leaf (or use a light colored-pencil as I did). Then, notice the lines running through the leaves, called veins. When you start drawing the veins, they start to resemble roads or rivers on a map. Do the lines go up or down from the petiole to the tip of the leaf?

drawleaves2b

If you’re an advanced doodler, you can spend more time and add more detail and shading. Try drawing several shapes, too, until you fill a page with doodled leaves.


3. Leaf Rubbings

Choose a leaf, a blank page, and several colored-pencils. Turn the leaf over to the (back)side where the veins protrude more from the surface, and place on a flat surface or table with this side facing up. Put your piece of paper on top, covering the leaf. Take a sharpened pencil, and, using the side (not point) of the lead, rub or color the page, revealing the lines of the leaf. It’s magic — I love seeing the leaf appear as you color. Move or turn the page slightly, and rub again with another color. Repeat a few times, layering the texture and colors:

leafrubbing

Variation: Paint the surface of the leaf, and then press the painted side onto a sheet of paper, transferring the color. You may need to experiment with the amount of paint needed to get an impression, without making it too goopy.


4. Fill in the Blanks

This might be a good exercise after you’ve done number 1 or 2, and you’ve had the chance to study the leaves a bit. Find a damaged leaf, or one that has missing parts. Draw the leaf, carefully filling in the blanks.


5. Doodle Collage

Choose a leaf and affix it to a blank page. Add a doodle, using the leaf as your inspiration. This is one of our favorite techniques here on kid can doodle: see how Moomooi, Claudi Kessels, and Christoph Niemann doodle with nature. Here’s a couple of examples of what I did:

sloth

Have fun!

bear

Hope you inspired to try a few leaf studies of your own! Hurry, before they all fall off the trees!


Follow my blog with Bloglovin


How to Draw Birds

KCDbirddrawings0


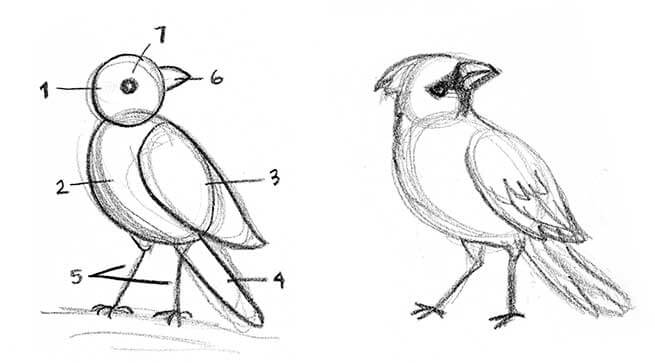
Above is a video of me drawing pelicans in Wynnum, near the bay in Brisbane, Australia. Birds are probably one of the easiest things to draw, with the most charming results. They’re basically made up of 7 parts or shapes:

KCDbirddrawings1

  1. the head; draw a circle
  2. body; add a larger oval
  3. wing(s); draw oval(s) with curved, tapered ends
  4. tail wing; make a narrow oval or rectangle
  5. legs & feet; stick lines indicate legs + feet; note the 4 toes/digits, 3 facing front, and 1 back
  6. beak, draw a triangle
  7. eye(s), add dot(s)

Some birds, such as pelicans or swans, have a long neck as well.

swan
This is one of my favorite birds to draw: the barn owl.


questionCan you find the 7 parts in the bird sketches below?

KCDbirddrawings2

Here’s how 15 different artists envision feathered friends. Hopefully they’ll inspire you to draw some too!


See more on drawing birds in our Doodle Tip: Draw from Real Life.


Follow my blog with Bloglovin