Here’s a step-by-step tutorial with tips for drawing your face. Before you begin, you will need:
- A mirror or photograph of yourself
- Drawing paper or pad
- Pencil or pen
- Optional: eraser or sharpener, and an easel or clipboard
A. Observation
Start by looking at your face (in the mirror or at a photo of yourself) and studying your features.

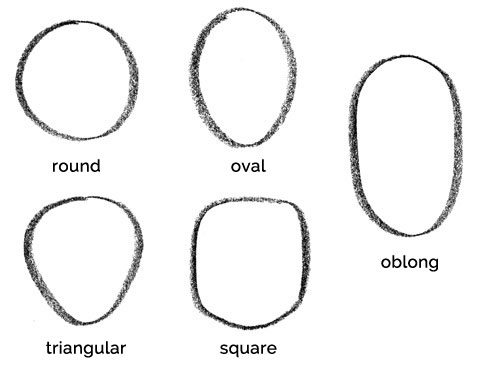
- Face shape. What’s the shape of your face?
- What’s the color of your eyes and hair?
- Do you have any distinguishing characteristics? For example, freckles, moles, glasses, or birthmarks can set you apart from others.
B. Foundation
Sketch the structure of your face:

- Draw the face shape (round, square, triangular, oblong, or oval—the most common)
- Divide the face in half with a light line to help a guide the placement of the features.
- Add a light line as a guide for the eyebrows.
- Continue with guidelines for the eyes, the bottom of your nose, mouth (line between upper and lower lip), chin, and (bottom of the) ears. TIP: Notice that the line for your eyes is approximately halfway between the top and bottom of the face (lower on toddlers and babies), while your ears line up with your eyes and the bottom of your nose.
- Lightly sketch the hairline.
C. Features
Draw in the features:
- Eyebrows – When you shape the eyebrows, try drawing in the direction that the hair seems to grow. For instance, start near the middle of the face, near the bottom of the brow and moving the stroke upwards and out, and repeating with the rest of the brow as you shape it. Sometimes for men with bushier brows, you’ll want to do the opposite, starting near the outside, at the top of the brow and coming downward with your stroke. TIP: Drawing them this way will make them look more realistic and natural. As you draw the brow, take note of how far they are from the sides of the face, and how much space is between them. Try and capture the expressiveness of the eyebrows because they give character to the face.

- Eyes – Look at your eyes, and study their shape. Start by outlining the top and bottom of the eyes, then draw in the pupil and iris, leaving a bit out of the black dot for the highlight of the iris. TIP: Leaving the white for the highlight will make the eyes look more alive. Note that you may not be drawing an exact circle for the pupil, and sometimes you can make the pupil slightly larger than they appear in the photo—you don’t want the whites of the eyes to dominate the space. For most people, the space between the eyes is about the width of one eye. Next, indicate the tear duct and eyelid fold.

- Nose – With the nose, sometimes just having a couple of dots for the nostrils is enough, especially if you want a dainty look, for a delicate face. You can add detail with a suggestion for the curves around the bottom, or shade a bit to shape the bridge or tip of the nose. And sometimes, for strong noses, or 3/4 and profiles, I may add a line from the inside of a brow, stretching to the tip of the nose, indicating the bridge. TIP: With this line, it’s important to only do ONE SIDE. You can shade the other side of the bridge, but having two lines for the bridge of the nose looks cartoony.

- Mouth – Most of the time, you don’t actually need to draw the entire mouth—just having a line between the top and lower lip, and an indication of the edge of the lower lip with a line or shading is sufficient. Sometimes for women, I draw the upper lip, shading with strokes to emulate the texture of the lips. TIP: For men, it’s more masculine NOT to draw the entire lips, but just indicate them with a few lines as shown above on the lower right. AND NEVER draw details for teeth. It NEVER looks right, and isn’t flattering in a drawing. As always, double-check the distance between each feature as they relate to each other.

- Chin and Ears – Strengthen the original lines you had for the chin and ears, and give them more detail and shape. Notice how much (less) space there is for the chin compared to the forehead. TIP: For men, squaring the jawline makes them appear more masculine.

- Hair – With hair, I try to draw the strokes to imitate the shape and flow of the hair. TIP: Notice where the shadows are, and make that part darker by drawing more hair detail, and conversely leave out detail in the highlights. This will make the hair look more realistic and natural.
Finally, take a step back and review your drawing. Do you need to add more shading anywhere? Do any lines need refining around the face? Do you need to add any details or adjust the spacing of any lines?
I hope these tips help you in your drawing. Let me know if you have any questions by replying below.


